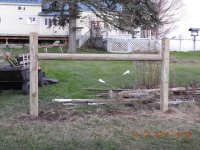
Fence post bracing

Bruce

Herd Master
Joined
Feb 4, 2016
Messages
17,451
Reaction score
45,865
Points
783
Location
NW Vermont
OOPS! I meant 5' OUT of the ground, 3' in :oops:. I can't imagine I could dig a hole 5' deep even if there were no rocks and the digging was easy. I'm having enough trouble getting down to 3' with most of them.

I have plenty of 6 1/2' posts, that is what most of the decent diameter ones that I've removed are. They aren't treated though, maybe not such a good idea to use them. I do have some treated "4x4" landscape timbers that the prior owner used as posts (those on the gate are 2 of them. The one on the hinge side came complete with concrete. Kind of a PITA getting it into the poly dump cart and over to where I needed it. The excavator pulled it out when the solar panels were put in so the cement truck could get to the site.

Yep, I know I need to X the wires for support in both directions when I have both a gate and fence.

Can I really put wire fence under tension on that steep a slope? Seems like it would just pop the T-posts straight up out of the ground where the "steep" shifts to "gradual".

"any post more than a few inches above the top wire is just holding up air"
Or hot wire :)
 

greybeard

Herd Master
Joined
Oct 23, 2011
Messages
5,940
Reaction score
10,805
Points
553
Location
East Texas
I'll have to draw a pic to show you how I did both the approaches to my pond dam, as well as where my fences went down to a quick sharp drop at the creeks. It involves some extra wooden posts.
 

Bruce

Herd Master
Joined
Feb 4, 2016
Messages
17,451
Reaction score
45,865
Points
783
Location
NW Vermont
Now that we have fence bracing mastered (OK, just got started learning though the second H brace was easier than the first):

WITHOUT creating a temporary H brace beyond the end post (which would be a MAJOR PITA, extra work and in minimally one case, creating it on someone else's property) how do you anchor the come-alongs to pull the fence? If it is anchored on the end posts, do you:
  • Nail it to the brace post then more or less hand tighten it around the end post?
  • Nail it top and bottom then move the come-along to the brace post and pull the fence around the end post? Somehow I can only see that as ineffective since the woven wire isn't exactly going to slip around a wood post. I guess one could put a metal pipe on the back side of the post so the fence could (maybe) slide.
  • Something else?
I will have a gate in the west line so there will be a double wired H brace for the hinge side. I can use that to pull the fence from fence from the corner to the strike side post. Won't work the other way around though. Maybe I can make a Q&D temporary floating brace inside the gate swing area to use the strike post to pull the fence to the hinge post? Same with the east line. Not sure about the north line since I may not have a gate there right off.
 

Latestarter

Novice; "Practicing" Animal Husbandry
Golden Herd Member
Joined
Dec 31, 2014
Messages
11,384
Reaction score
17,483
Points
623
Location
NE Texas
Do you have a vehicle that you can pull up to attache the come along to? or maybe a tree or something a little ways off?
 

Bruce

Herd Master
Joined
Feb 4, 2016
Messages
17,451
Reaction score
45,865
Points
783
Location
NW Vermont
Nope and nope ;) The come-alongs would make my garden tractor "come along" :lol:

And a single point to a vehicle would be a bad plan (I know it is not uncommon though) since the height of that point on the vehicle (shy maybe an FEL on a tractor which is height adjustable) wouldn't likely be anywhere near the center of the fence puller. Plus, there is no guarantee that you can pull equally on the top and bottom of the stretcher when you join those to a common pull point and put the come-alongs between that and the "solid point".

Another thought:
  • A long piece of rebar could be stuck in the ground like a tent stake
  • A tensioned brace wire goes from that to the post you want to pull against about the same height as the upper come-along.
  • Also tension a wire for the bottom come-along to the "stake".
  • That "pull against" post could be a temporary T-Post right? Lots easier to get in the ground far enough to do any good than a 6" post.
SEEMS like it would work and not be a whole lot of extra effort (unless you hit ledge not far down)

Another thing I saw on YouTube was two tension bars and pulling fence from both ends to the middle. Seems a bit squirrely to cut the fence then have to join it back together but if you can do it in the middle of a gate opening, it would be 2 pieces of fence anyway. That will work on the west side of the project. Since I'll be making my own fence puller I can make two, just a few extra bolts, washers and nuts. I have PLENTY of 2x4s that were ripped out of the rebuilt part of the house.
 

Bruce

Herd Master
Joined
Feb 4, 2016
Messages
17,451
Reaction score
45,865
Points
783
Location
NW Vermont
Well, I sort of lied (old age lack of attention I guess). There IS a small group of trees (so close they are almost one) west of the NW post. If I got some long enough chains I could pull the north piece of fence to them.

Made my first floating brace today for the SE corner. Note to self (and maybe others) next time tap in the fence staples on the bottom of the brace BEFORE installing it. PITA trying to get them in close to the ground. Got it all wired with the strainer just before it got too dark to see what I was doing to put the tools away.

I did not notch the post. I cut the angles on the brace then stuck it in place and drilled through the post into the brace (down the center of the brace) with my 11" drill bit and hammered in the 10" brace pin. All wired up that sucker is STIFF!! Makes me feel more confident that the post in the NW corner that I am going to concrete in will be more than stiff enough braced in 2 directions.

BTW, when I made the first H brace it was a pain to get the brace lined up and level and the hole in the brace post just right to match the predrilled hole in the brace. And when it was done the brace wasn't totally in contact with the posts, I used my ratchet straps to pull them together and set the pins all the way. PITA! When I made the second one I trapped the brace between the posts and used the ratchet straps to hold it tight while I drilled the hole for the pin in the brace post and brace as I did today for the floating brace. SO MUCH EASIER! I see no reason to pre-drill anything on this. Especially if you are going to hang a gate on the H, you'll need to cross brace it anyway so why not drill through both posts into the "trapped" brace so you can leave an inch or so of pin out to hold the wire up?
 

Bruce

Herd Master
Joined
Feb 4, 2016
Messages
17,451
Reaction score
45,865
Points
783
Location
NW Vermont
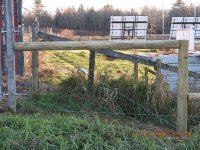
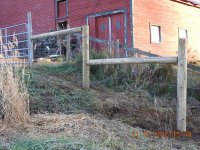
OK, this is what I did at the high side:
DSCN0384.jpg DSCN0385.jpg

Note that I ran the brace wire up to just above the upper bolt hook on the gate post rather than where the brace is located. Figured, as @greybeard said, anything above the brace is holding up only air, hoping that translates to "anything above the brace wire is holding up only air". If this is incorrect and I should lower it to the level of the brace, let me know. I still need to add cross bracing on both of these since the bottom half will be supporting a gate and fencing coming down from the top post. And the top post needs it because it will be the anchor point for the 16' of fence on this double H. Going to look kind of squirrelly with the vertical fence wires not being even minimally vertical.

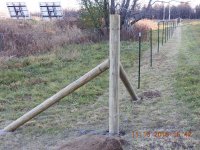
And here is my NW corner post, floating braces and cemented. Not real fond of the idea of the strainers just laying near ground level. Do people do anything to protect them from the elements so they will still be workable in a year or 3?
DSCN0386.jpg

You can see the height difference between the top gate and the NW corner post. The white line is the string marking the fence line, it is not attached to the ~4' high posts in the existing fence, just looks like it. Since I'm putting a gate on the low end of the double H, the actual fence run will start lower.
DSCN0387.jpg

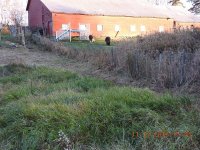
And here is the H brace on the North end of the East line. I kinda messed up with the first strainer, it is almost dead center. That would be OK if it wasn't double braced but fortunately the second wire just misses it. There will be a gate on the left side of this and fence running south to the right.
DSCN0392.jpg
 

greybeard

Herd Master
Joined
Oct 23, 2011
Messages
5,940
Reaction score
10,805
Points
553
Location
East Texas
And here is my NW corner post, floating braces and cemented. Not real fond of the idea of the strainers just laying near ground level. Do people do anything to protect them from the elements so they will still be workable in a year or 3?
View attachment 24222
The ones I use and have seen are all galvanized and aluminum. Never had problems with them later down the road. Some of mine have ended up almost buried in the dirt and still work fine.
I got called away on family stuff out of state right after I said I would show how I did my uneven ground fence lines, but you did fine.
One thing tho. Use as large a slab concrete under the floating brace as you can find. That slab or rock takes tremendous pressure 24/7 for years and if it gets pressed down into the ground, the vertical post will lean and the fence integrity will be compromised. You can go back and take a few more clicks on the ratchet but odds are, it will just sink again later.

For general purposes, and mostly for future reference to those who have never built a fence, let's look at how corners and ends actually work. I have often been accused of overthinking things, but I have always found it easier to do and/or fix things if I know 'why' things work. This is probably one of those times

On a traditional H brace, the wire tied to the anchor post, (post a below) and H braces work, by transmitting 1/2 the tension that is on that anchor post, on to the vertical brace post (b). Ideally, both of the vertical posts will have equal tension on them, with that tension transmitted by the horizontal post(c) between the vertical posts. Remember--the whole point of any brace type is to prevent the anchor post (a)from moving laterally in the soil. The staples in the brace post(b) don't really take much of the strain off the anchor post--they are driven in after the strain is applied to the anchor post--on top of that, wire tends to slip thru the staples after a period of time anyway.
hpost.jpg


In the above example, I have two 8" diameter posts planted 36" in the soil. The thing that prevents a post from moving, is the total area of soil presented to the posts. Depth X width. In this example, each hole presents 288 sq inches of soil resistance to strain caused movement for a total of 576 sq inches. This can be increased in a number of ways.
a. Dig the hole deeper and/or use a larger diameter post.
b. Dig the hole wider (let's say 12" diameter) and pour concrete around the 8" post effectively turning two 8" dia posts into two 12" diameter posts.
c Dig the hole wider, and deeper & pour the concrete.
It's all about presenting more area of soil resistance to tension.
Take an index finger, stiffen it and poke it into the ground- note the penetration.
Make a fist and push with the same effort-note the penetration. Penetration will be less with the fist because of increased soil area in sq inches to force exerted.
For discussion and comparison, let's just stick with 8" diameter posts, buried in native soil 36" deep..

If, you have a rock or other impenetrable strata where you want your corner or end posts, and can't dog very deep, you are stuck with having a shallower hole, so you will want to use a larger diameter post or.. the same diameter post, but a larger hole with concrete poured around the post. It all depends on soil type, rainfall, and how long the run of the fence is.

Now, let's look at how a floating brace works. You will have your same anchor post (a) but no vertical brace post upon which to transmit tension to. The tension in a floating brace setup is transmitted down to the rock or slab that sits under the diagonal brace. The diagonal takes the place of the horizontal post (c) and the slab or rock takes the place of the vertical brace post(b).

In order to relieve and disperse about 1/2 the strain on the anchor post(a).. the area in sq in of the slab or rock needs to roughly equate the same area in sq inches as the vertical brace post would offer in an H setup.
In the crude drawing below, we have the same 8" diameter anchor post(a) 36" in the ground. The same 288 sq in of surface area of soil presented in resistance to movement.
flobra.jpg


The slab in this picture is only 12"x12" which means it has a surface area of only 144 sq inches, providing a combined total soil surface area of resistance to movement of 432 sq inches. We have saved ourselves digging an extra hole and the cost of a big post, but now have a setup that is less effective than a traditional H post corner or end. What to do?
Increase the size of the slab or rock to approximately "17 X 17" or anywhere close to it. 17x17=289 sq inches + the 288 sq inches from post a=577 sq inches. Any increase will do fine tho. I sometimes use two 14"x14" paving stones, with a 12"X12" paver centered on top of the seam where the 2 pavers meet. That roughly doubles the size of the slab.
 
Top