Ideas on fence corners anyone?

babsbag

Herd Master
Joined
May 10, 2010
Messages
7,886
Reaction score
9,319
Points
593
Location
Anderson, CA
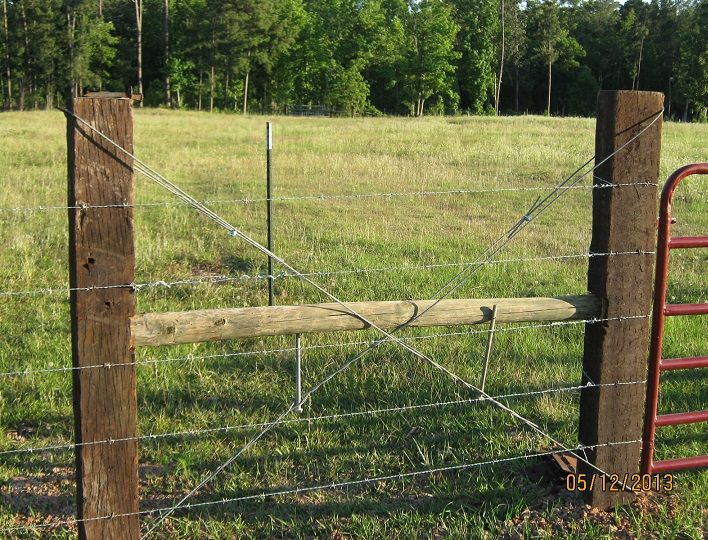
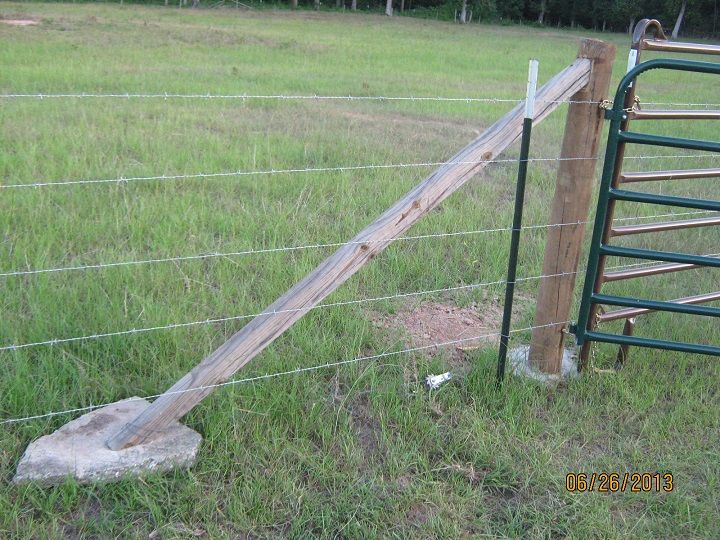
@Mike CHS The corners have been there for 8 years with no problems and when we installed them we were able to stretch the fence off of it. We did pound the corner one in about a foot deeper than the others. Our soil is very rocky, and not just big rocks, just very loose soil so posts don't stay in very well unless they are deep.

But I don't have animals rubbing on the either, I use hot wire to keep the goats and dogs off of the fences.

Sounds like you got a really good buy on those pieces.
 

soarwitheagles

True BYH Addict
Joined
Dec 24, 2015
Messages
698
Reaction score
792
Points
263
Location
Sacramento County
I've used them for years, but without bracing, after 10-20 years, they will lean, if the fence is stretched anywhere close to tight. I'm 65 and have built miles of fences since 1965 and have never had a corner or end of fence post fail or lean. This is the way I used to do all of them and still do-- in a gate opening.
Since this is a gate opening, I brace wired it in both directions--one to keep the wire tight-one in the opposite direction to keep the gate from ever sagging. I used cable on this one, but probably overkill--I just happened to have several hundred feet of it extra.
garden%20fencing2013%20017_zpsjthu7uic.jpg


On the other side of the gate, I would just do something different nowadays, and save myself some $ and work. Read below:
Another option for the thread starter, unless you just really like digging 2 extra holes and buying 2 big posts that you don't really need, is what is known as a Floating Brace arraignment.
In you first picture, your diagonal braces are fastened too high on the vertical post--angled too much and offer no real leverage to hold the post straight and plumb, and in fact, if you aren't carefull, can force the vertical post up out of the ground.
For a single corner using the floating brace method, you will need:
One 6"-8" diameter post 6-8' long. (this is 2/3rd less than the # of big posts needed in a normal double H pattern corner and of course 2/3 less cost of the traditional double H post corner)
Two 3-4" diameter posts 6-8' long.(this is the same # of braces needed in an H post corner)
two $3 spring clip wire strainers--readily available at most stores such as Tractor Supply.
2 flat rocks or flat pieces of concrete, like a 12"x12"x2" paving stone.
a couple of large nails.
a couple of pieces of HT wire.
One hole in the ground.
A saw of some kind to cut an angle on each end of the 3"-4" posts.

They make different types of spring clip wire strainers, but this is what I use:
Wire-Strainer-254x254.jpg


What is a floating brace corner? I'll show you two different pics and explain the difference:
This is the first one I ever built at the end of a long run and to be honest, it is done incorrectly. It still works but I really should re do it. The diagonal is placed too high on the vertical post. If the vertical post were not set in concrete, the diagonal would tend to force the vertical post up out of the ground when I tightened down on the ratchet of the strainer.
house13%20006_zpsxvqlopab.jpg

Two views of a correctly done floating brace corner. The fence goes in one direction about 300 yards and in the other direction about 400 yards, and the wires are banjo string tight. This type corner works for elec HT wire, barbed wire, and any type net fence, welded, woven or knotted.
003_zpsvxhgkhv9.jpg

002_zps2jlysrxf.jpg

In the above photos, you can see the angles cut on the diagonal brace posts. You can also see where the wire and strainers go. The strainers are a little higher than need be, but I don't worry about aesthetics too much in open pasture.
First, set your corner post, however you normally would. I tend to plant em 36" deep, a little dry concrete in the bottom six inches, and the rest filled with native soil that came from the hole. Your option--I won't argue the best way to set a post. Just make sure it is straight in all directions.

On the post, just make a loop with your brace wire, threading it thru the end of the strainer, and tie it off--western union splice knot works fine or if you use the crimp ferrules, one will hold just fine. Place your diagonal post against the vertical post about 1/2 way between ground and the top of the post.
Place the ground end of the diagonal ON the ground to mark the angles. Place your 'rock' next to the ground end of the diagonal. Make a mark on the bottom of diagonal post along the top edge of your 'rock', indicating the angle. Mark the corresponding angle where the vertical and diagonal post meet. Take the diagonal down, and Cut your angles. Now, place the 'rock' where it will forever be, in line with where the wire will run. Again position your diagonal brace post against the vertical post and on the rock. At this point, drive a big nail into the angle at the top of the diagonal to hold it firmly against the vertical post--a BIG nail. (some people will cut a notch in the vertical post for a perch for the diagonal to sit in--I do not.)

On the ground end of the diagonal post, take a length of wire long enough to loop around the bottom of the diagonal post, and still long enough for the other end of the wire to thread thru the hole in the wire strainer's ratchet spool. Loop one end of said wire around the post and tie back to the opposite side of the post. Dive a fence staple (or 2) to hold that loop at the bottom part of the diagonal post. Run the other end of the wire thru the spool of the strainer. It only needs to protrude thru the spool about 1" but leave enough slack between the diagonal post and the wire strainer to take a couple of turns with the strainer. Start tightening up the strainer until all the lack is out of the brace wire but not so tight you move the post.

Go to the other side of the post and do all the above for the opposite side of the corner. When you have all the slack out of the 2nd brace wire, alternately tighten the strainers until both wires are tight. I usually tighten them till just before the breaking point ;)

After you have strung your fencing, any wire passing along side the diagonal post can be stapled to the diagonal. It will prevent an animal or wild tractor driver from accidentally kickin the end of the diagonal off the 'rock'.

If you have goats, DO place the diagonal on the outside of their pen--they may try to climb the diagonal post if you do not. I raise full size brahma influenced cattle (Beefmasters) so i don't worry about climbing. I've used the above type corners for years now, and the savings on the corner pictured is $15 each for the two big post I didn't need plus the time and labor digging holes for them. My instructions may sound like a lot of work, but believe me it is not hard at all, especially compared to a conventional double H post corner, and it is certainly faster than the conventional corner. The only people who say these won't work are those who have never tried them. If you wonder what kind of ground I have, it changes from hard as a hooker's heart in summer to soft as an angel's turd the rest of the year. you can get an idea how soft it gets around here by looking in my 'river thread' in the Random Ramblings section.

At the bottom of this webpage is some more on floating braces--some people call this a Kiwi Brace.
http://fyi.uwex.edu/grazres/files/2012/01/bracing.pdf

Another picture from someone I know via internet, tho we both agree the diagonal is probably too high--applies more 'upward' pressure than horizontal pressure.
13.jpg

Greybeard,

If only I had asked BEFORE I installed our corners! Wow! Absolutely amazing write up with supporting pictures! Thank you so much for sharing. It is obvious you are a master of building fences...decades of experience and literally miles of fencing...

I will redo all corners exactly as you have shared. It really won't be all that much work...just wish I had asked much sooner.

Hope it is ok with you if I ask questions as I "remodel" all corners into the "Floating Brace" version. It appears so simple, yet incredibly effective and also a big time and $$$ saver!

Great post @greybeard. That was very informative and the pictures illustrated your description so well. Maybe @soarwitheagles , this might be a better option for you and save you money.

Yes, I totally agree! I am sold on this plan.

Greybeard - I have read several articles about that type of fence setup but never quite get my little pea brain around it. You write-up is excellent and makes it look a lot more convenient to install.

Ditto!

As I am still learning and have a lot of fencing to do, I want to thank everyone here for all the great information and pictures they are posting!

Just sitting back studying these threads is so helpful. Lots of information to take in and a lot of work ahead of me.

Your taking the time to help others certainly benefits more than the original poster.

Thank you.

Double Ditto!

They can, but remember, the single floating brace only hold strain in one direction. If you use them at a gate, the hinge post of the gate is only held straight up and down and weight of the gate is offset only by the tightness of the wire--the floating brace's diagonal will be pushing toward the gate.

I have with success, also used a floating brace setup to straighten up an existing post. Instal it, tighten up on the strainer, then a couple weeks later, especially after a soaking rain, return and take a couple more clicks on the ratchet of the strainer spool.
(I forgot to include the strainer tool in the list of materials, tho I have also just tightened them with a crescent wrench as long as the strainer has a square on one end--some are round on both ends and will require the tool below--about $7 but will last forever.)
PTT-814209-STRAINER-TENSIONER-HANDLE-(A3).jpg

Thanks again for the clarity! Does anyone know if TS still sells the spring clip wire strainers and strainer tool?

Thanks!
 

Latestarter

Novice; "Practicing" Animal Husbandry
Golden Herd Member
Joined
Dec 31, 2014
Messages
11,384
Reaction score
17,481
Points
623
Location
NE Texas
Anyplace that sells wire for fencing should carry those. I have seen them at TSC, so you should have no problem finding them.
 

soarwitheagles

True BYH Addict
Joined
Dec 24, 2015
Messages
698
Reaction score
792
Points
263
Location
Sacramento County
SPECIAL UPDATE:

MASSIVE THANKS TO GREYBEARD!!!

I carefully looked at his "floating fence brace" design, and thought I would give it a whirl...

I can only say "Wow!"

Super easy. Super inexpensive. Super effective. Super fast installation.

That makes you Greybeard, Superman in my book!

Posting some pics...

Thanks again everyone for your help!

Soar

f1.JPG
f2.JPG
f3.JPG
 

Latestarter

Novice; "Practicing" Animal Husbandry
Golden Herd Member
Joined
Dec 31, 2014
Messages
11,384
Reaction score
17,481
Points
623
Location
NE Texas
I'm not really 100% sure, but with the tension wire all the way at the bottom of the brace, it's going to make the brace where it attaches to the corner post push up on the post (help push it up out of the ground). If you lean a ladder against a wall and then push the bottom toward the wall, the bottom of the ladder will move in while the top moves higher. I "think/believe/am pretty sure" the tensioner wire should actually be about 1/3 to 1/2 way up the brace so it's pulling the top of the brace down (supporting the corner post) and also pulling the bottom of the brace in and down (onto the brick support) so it can't move away.

But yeah, looks good, easy, fast, inexpensive, etc. :D
 

Baymule

Herd Master
Joined
Aug 22, 2010
Messages
34,988
Reaction score
106,962
Points
873
Location
East Texas
Back up to page 3 @Latestarter . @greybeard shows the tension wire exactly the way @soarwitheagles did his.

I probably do my braces all wrong with the tension brace wires. I more than likely angle them in the wrong "pulling" direction. So in the best interest of my fence design, I just cris-cross the darn things and that's probably wrong too. Oh well, it keeps the critters in.....

@soarwitheagles you have been busy!! Your fencing looks great! no matter which way you are supposed to cris-cross wires-or not cris-cross-or whatever...... :lol:
 

soarwitheagles

True BYH Addict
Joined
Dec 24, 2015
Messages
698
Reaction score
792
Points
263
Location
Sacramento County
I'm not really 100% sure, but with the tension wire all the way at the bottom of the brace, it's going to make the brace where it attaches to the corner post push up on the post (help push it up out of the ground). If you lean a ladder against a wall and then push the bottom toward the wall, the bottom of the ladder will move in while the top moves higher. I "think/believe/am pretty sure" the tensioner wire should actually be about 1/3 to 1/2 way up the brace so it's pulling the top of the brace down (supporting the corner post) and also pulling the bottom of the brace in and down (onto the brick support) so it can't move away.

But yeah, looks good, easy, fast, inexpensive, etc. :D

LS, I thought greybeard mentioned 1/3 to 1/2. I actually installed the brace exactly 3 ft. above the ground. Woven wire is 4ft., 2-3 strands of soon to be installed barb wire will place the finished fence at 6-7 ft. So far, no upward pushing of the posts that we can find...

Back up to page 3 @Latestarter . @greybeard shows the tension wire exactly the way @soarwitheagles did his.

I probably do my braces all wrong with the tension brace wires. I more than likely angle them in the wrong "pulling" direction. So in the best interest of my fence design, I just cris-cross the darn things and that's probably wrong too. Oh well, it keeps the critters in.....

@soarwitheagles you have been busy!! Your fencing looks great! no matter which way you are supposed to cris-cross wires-or not cris-cross-or whatever...... :lol:

Bay, thank you for your words of encouragement...and yes, I did try to copy GB's design exactly. It sure was much easier than the "H" design...my only regret is not doing all of them with the floating version...now I will re-do the others as soon as I find some time...

By the way, I use the cris-cros method in many different areas of life...yep, I cris-cros my fingers for better luck with sheep, fencing, bees, you name it, I cris-cros it! :lol:
 
Top