greybeard
Herd Master
I've used them for years, but without bracing, after 10-20 years, they will lean, if the fence is stretched anywhere close to tight. I'm 65 and have built miles of fences since 1965 and have never had a corner or end of fence post fail or lean. This is the way I used to do all of them and still do-- in a gate opening.We use railroad ties, buried 3-4 feet deep at corners. No need for bracing.
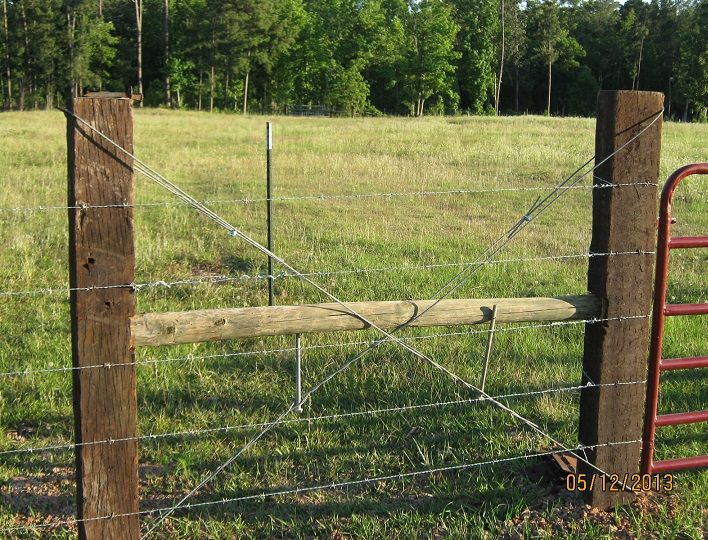
Since this is a gate opening, I brace wired it in both directions--one to keep the wire tight-one in the opposite direction to keep the gate from ever sagging. I used cable on this one, but probably overkill--I just happened to have several hundred feet of it extra.

On the other side of the gate, I would just do something different nowadays, and save myself some $ and work. Read below:
Another option for the thread starter, unless you just really like digging 2 extra holes and buying 2 big posts that you don't really need, is what is known as a Floating Brace arraignment.
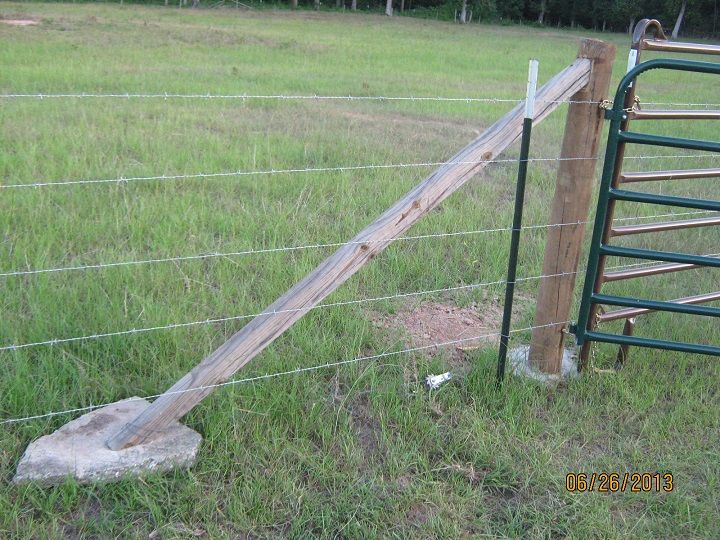
In you first picture, your diagonal braces are fastened too high on the vertical post--angled too much and offer no real leverage to hold the post straight and plumb, and in fact, if you aren't carefull, can force the vertical post up out of the ground.
For a single corner using the floating brace method, you will need:
One 6"-8" diameter post 6-8' long. (this is 2/3rd less than the # of big posts needed in a normal double H pattern corner and of course 2/3 less cost of the traditional double H post corner)
Two 3-4" diameter posts 6-8' long.(this is the same # of braces needed in an H post corner)
two $3 spring clip wire strainers--readily available at most stores such as Tractor Supply.
2 flat rocks or flat pieces of concrete, like a 12"x12"x2" paving stone.
a couple of large nails.
a couple of pieces of HT wire.
One hole in the ground.
A saw of some kind to cut an angle on each end of the 3"-4" posts.
They make different types of spring clip wire strainers, but this is what I use:

What is a floating brace corner? I'll show you two different pics and explain the difference:
This is the first one I ever built at the end of a long run and to be honest, it is done incorrectly. It still works but I really should re do it. The diagonal is placed too high on the vertical post. If the vertical post were not set in concrete, the diagonal would tend to force the vertical post up out of the ground when I tightened down on the ratchet of the strainer.

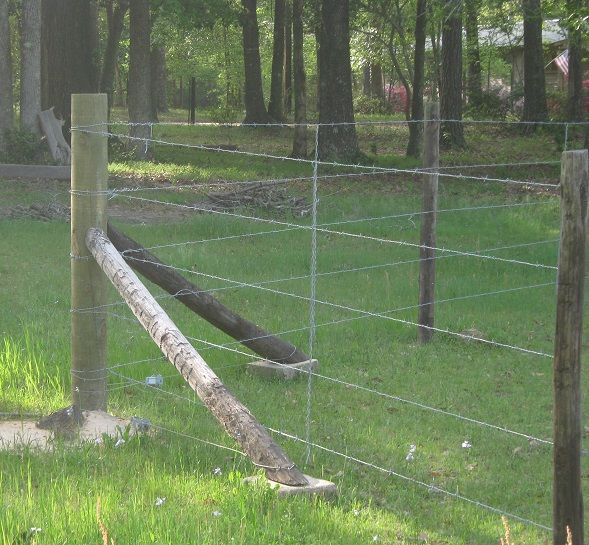
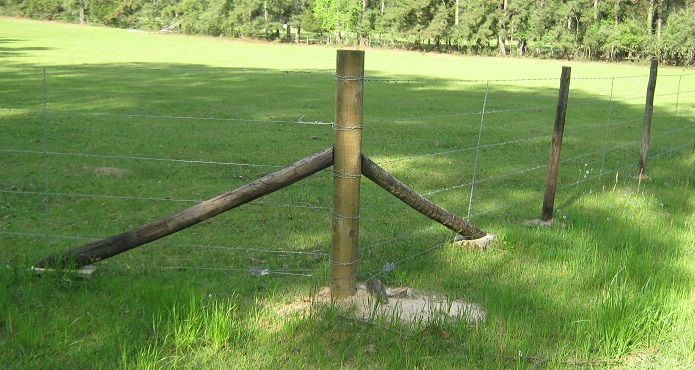
Two views of a correctly done floating brace corner. The fence goes in one direction about 300 yards and in the other direction about 400 yards, and the wires are banjo string tight. This type corner works for elec HT wire, barbed wire, and any type net fence, welded, woven or knotted.


In the above photos, you can see the angles cut on the diagonal brace posts. You can also see where the wire and strainers go. The strainers are a little higher than need be, but I don't worry about aesthetics too much in open pasture.
First, set your corner post, however you normally would. I tend to plant em 36" deep, a little dry concrete in the bottom six inches, and the rest filled with native soil that came from the hole. Your option--I won't argue the best way to set a post. Just make sure it is straight in all directions.
On the post, just make a loop with your brace wire, threading it thru the end of the strainer, and tie it off--western union splice knot works fine or if you use the crimp ferrules, one will hold just fine. Place your diagonal post against the vertical post about 1/2 way between ground and the top of the post.
Place the ground end of the diagonal ON the ground to mark the angles. Place your 'rock' next to the ground end of the diagonal. Make a mark on the bottom of diagonal post along the top edge of your 'rock', indicating the angle. Mark the corresponding angle where the vertical and diagonal post meet. Take the diagonal down, and Cut your angles. Now, place the 'rock' where it will forever be, in line with where the wire will run. Again position your diagonal brace post against the vertical post and on the rock. At this point, drive a big nail into the angle at the top of the diagonal to hold it firmly against the vertical post--a BIG nail. (some people will cut a notch in the vertical post for a perch for the diagonal to sit in--I do not.)
On the ground end of the diagonal post, take a length of wire long enough to loop around the bottom of the diagonal post, and still long enough for the other end of the wire to thread thru the hole in the wire strainer's ratchet spool. Loop one end of said wire around the post and tie back to the opposite side of the post. Dive a fence staple (or 2) to hold that loop at the bottom part of the diagonal post. Run the other end of the wire thru the spool of the strainer. It only needs to protrude thru the spool about 1" but leave enough slack between the diagonal post and the wire strainer to take a couple of turns with the strainer. Start tightening up the strainer until all the lack is out of the brace wire but not so tight you move the post.
Go to the other side of the post and do all the above for the opposite side of the corner. When you have all the slack out of the 2nd brace wire, alternately tighten the strainers until both wires are tight. I usually tighten them till just before the breaking point
After you have strung your fencing, any wire passing along side the diagonal post can be stapled to the diagonal. It will prevent an animal or wild tractor driver from accidentally kickin the end of the diagonal off the 'rock'.
If you have goats, DO place the diagonal on the outside of their pen--they may try to climb the diagonal post if you do not. I raise full size brahma influenced cattle (Beefmasters) so i don't worry about climbing. I've used the above type corners for years now, and the savings on the corner pictured is $15 each for the two big post I didn't need plus the time and labor digging holes for them. My instructions may sound like a lot of work, but believe me it is not hard at all, especially compared to a conventional double H post corner, and it is certainly faster than the conventional corner. The only people who say these won't work are those who have never tried them. If you wonder what kind of ground I have, it changes from hard as a hooker's heart in summer to soft as an angel's turd the rest of the year. you can get an idea how soft it gets around here by looking in my 'river thread' in the Random Ramblings section.
At the bottom of this webpage is some more on floating braces--some people call this a Kiwi Brace.
http://fyi.uwex.edu/grazres/files/2012/01/bracing.pdf
Another picture from someone I know via internet, tho we both agree the diagonal is probably too high--applies more 'upward' pressure than horizontal pressure.

Last edited:

.jpg)