Senile Texas Aggie - comic relief for the rest of you

greybeard

Herd Master
Joined
Oct 23, 2011
Messages
5,940
Reaction score
10,804
Points
553
Location
East Texas
GB mentioned the seed bank, if you really want to stir it up, run a tractor disc around the tree. Stirring up the dirt will make hundreds of seeds spring to life.
STA..
Bay may have simply been being facetious but please do not do this.
Look at what was growing there before you cut it. Saplings, viney stuff and woody brushy weeds.
Look at the size/height of them.
Consider the number of years they have been there and dropping seed.
Those plants, are the source of the seeds that will "spring to life".
If you didn't want them growing there this week, why would you want them next spring?
You'll have plenty of resprouts without encouraging more.
 

Baymule

Herd Master
Joined
Aug 22, 2010
Messages
35,651
Reaction score
110,112
Points
893
Location
East Texas
:lol::lol::lol::lol::lol:

I am currently enjoying the fruits if doing just that in my garden. I went no-till, using cardboard and mulch to suppress weeds and improve my pure sand soil. But this spring, I ran the tractor around in the garden with the disc. The seedbank erupted, fed by my hard work of improving the soil and the rains that never seemed to stop. I have the purdiest crop of giant ragweed, lamb's quarters and various other weeds you ever saw. I swear, I think the last 20 years of seeds all came up-twice! :lol: Yesterday we put up plastic fencing around the "good" parts and let the sheep in. They will clean it up for me.

So, no...….don't disturb the soil where you just cleaned up! ;)
 

Senile_Texas_Aggie

Herd Master
Joined
Jun 3, 2018
Messages
1,870
Reaction score
5,466
Points
343
Location
western Arkansas
All,

Thank all of you so much for the compliments. We are working slowly but steadily to clearing out around the edges of the pasture, as the two previous owners did not do that. For over 10 years they simply mowed it for hay. But as larger trees would grow branches out into the pasture that were low enough down to prevent a tractor from going under them, they did not trim back those limbs. Instead, the ground underneath the limbs would grow up with weeds, then bushes, then small trees to the point where the pasture became smaller, with the woods continuing to encroach into the pasture. We are trying to reclaim that land, leaving the large trees in place but cutting the low hanging limbs back, and cutting down the weeds, shrubs and small trees.

My plan for that area underneath the 2 trees is simply to mow it. If saplings or weeds start coming up, I will spray them with a Roundup/Remedy mix.

This morning I decided to see if my Beautiful Gal's favorite tool, the pole saw, would work even with the bad nick in the guide bar. It worked fine, except that the chain is somewhat loose. So my Beautiful Gall joined me and we started clearing out along the small ditch that runs between the eastern pasture and the one to the south of it (where those two trees are located). We stopped after 4 hours. The heat just drains us.

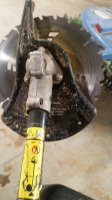
Yesterday while cutting down the small trees and brush under the 2 trees, my brush blade started acting up to the point where it became almost unusable. The problem with it is that the part where the blade attaches to the shaft has gotten loose and will rotate around the shaft. Here is a picture that perhaps will make it clearer:
20190605_113659_brush_blade_reduced.jpg
The gray part, which contains something (probably a gear) to change the direction of the rotating shaft from the power head to turn the blade, no longer fits tight on the black outer shaft (which has a yellow warning sticker on it in the picture). The Torx head screw is as tight as I can get it, but the gray part will still easily rotate on the black shaft to where I can no longer engage the cutting blade. What can anyone recommend as to how I can prevent the gray part from rotating on the black shaft?

Senile Texas Aggie
 

greybeard

Herd Master
Joined
Oct 23, 2011
Messages
5,940
Reaction score
10,804
Points
553
Location
East Texas
Yesterday while cutting down the small trees and brush under the 2 trees, my brush blade started acting up to the point where it became almost unusable. The problem with it is that the part where the blade attaches to the shaft has gotten loose and will rotate around the shaft. Here is a picture that perhaps will make it clearer:
It's Troybilt?
I answered this somewhere else not long ago..There is a video that I took the pictures from but I don't have the link to it saved.
Should be a set screw on the side of the gearbox in addition to the allen head cap screws on the shaft tube clamp. Is it there?
setscrew.jpg


Assuming the set screw has not worked itself out, There is a hole in the shaft tube, that the set screw engages. Often, that hole becomes enlongated and the set screw then moves radially around the shaft tube a bit. This hole should be round, not oval shaped:
elongated.jpg


The fix is to remove the set screw, and loosen the 2 clamp screws, then pull the head from the end of the shaft tube completely, look on the other side of the shaft tube 180° and you will find a good hole (good holes are always good to....oh..never mind...) :hide

notelongated.jpg

Reinstall the head using the good hole for the set screw, then tighten the 2 clamp screws.
You will then probably have to rotate the whole shaft tube at the upper end shaft tube clamp to make the head be properly oriented...otherwise it would be upside down.
I can tell the shaft tube clamp screws themselves are tight, as the line (opening) that runs up the clamp is completely closed up, but that clamp itself is not enough..the set screw is what does most of the holding.

I'll try to find the video that explains the whole repair.
It's something like "Troybilt loose shaft"

.
 
Last edited:

greybeard

Herd Master
Joined
Oct 23, 2011
Messages
5,940
Reaction score
10,804
Points
553
Location
East Texas
I have also seen units come in to the shop I used to work at, where this was done:
(Remove ALL 3 screws..the 2 clamp screws and the set screw)
setscrewb.jpg

Inversely, instead of effectively decreasing ID of head clamp, you can also increase size of the shaft tube OD with a layer or 2 of double sided tape or use HVAC alum or copper foil tape.
If you choos to do the die grinder/dremel too thing, Be careful not to make the opening in the head so large that when tightening the screws that the clamping force collapses the tube..or worse, cracks the aluminum head.
 

Senile_Texas_Aggie

Herd Master
Joined
Jun 3, 2018
Messages
1,870
Reaction score
5,466
Points
343
Location
western Arkansas
Mr. @greybeard, sir!

Thanks so much for this. I will have to do one or more of the things you have described above. I'll get it fixed one way or another. That tool proved to be too handy to lose its functionality.
 

Senile_Texas_Aggie

Herd Master
Joined
Jun 3, 2018
Messages
1,870
Reaction score
5,466
Points
343
Location
western Arkansas
Mr. @greybeard, sir

It turned out that the brush cutter aluminum head did not have a set screw -- it had already fallen out! I did not have another screw that would fit that hole that was short enough. So I decided to wrap the black inner shaft with a thin piece of sand paper and then insert the black inner shaft into the aluminum head and tighten it down. It worked like a champ!

Still don't have the gate opener fixed. The controller board turned out to be OK. As a test, I moved the wiring for the second gate to the wiring slots for the first gate and the gate opened and closed just fine. So I suspected that I broke some of the wires (either the green and/or the white position sensing wires). I decided to cut out a portion of the wires where the mower hit them and then splice them back together. I also removed the motor and did a continuity test on all of the wires to ensure that they all were connected. The splice worked. But when I reinstalled the motor on the gate and hooked up the wires to the controller board again, I had trouble getting the gate to open and close properly. Even the other gate motor got to where it was acting up! :he After fooling with it for 30 minutes or so, I decided to wait until another day to continue with troubleshooting the problem. Ah, the joys of farm ownership!

We continued cutting the undergrowth along one side of the small drainage ditch between the east pasture and the northern most of the 3 south pastures. We managed to get about 30 feet of trees, brush, and limbs cut before calling it quits for the day. I will post before and after pictures once we get finished.

I'll be asking everyone for fencing advice soon, so get ready!

I hope everyone has a wonderful day! :frow

Senile Texas Aggie
 

Senile_Texas_Aggie

Herd Master
Joined
Jun 3, 2018
Messages
1,870
Reaction score
5,466
Points
343
Location
western Arkansas
Hey, all,

I just saw a YouTube video about using a subsoiler. That is something I have never heard of. The man doing the video was using it to try to improve his water drainage.

What do you folks know about a subsoiler? Does it really help improve water drainage? I have several places here on the farm where the soil takes quite a while to dry out, and am wondering if I should use something like that.

Senile Texas Aggie
 

Bruce

Herd Master
Joined
Feb 4, 2016
Messages
17,451
Reaction score
45,860
Points
783
Location
NW Vermont
I don't know much, especially about subsoilers but from what I read they are meant to break up hard soil for planting. I've also seen videos of people who have rigged up a curved pipe to their subsoiler and use it to bury cable. I'm not sure that cutting "channels" in clay is going to help it drain unless maybe if the clay layer is shallow and the subsoiler is cutting down in to something that will drain. Seems like what he really needs is to put in drain "tile".
 
Top